Instructions for use
Home
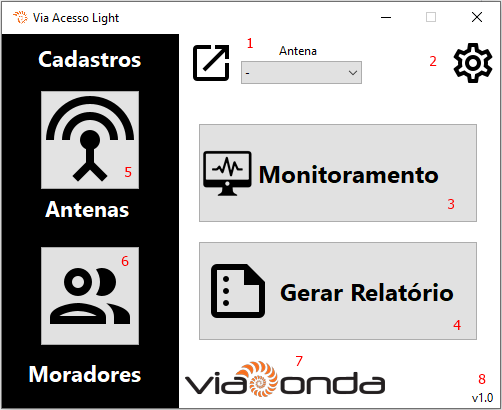
On the initial screen of the software we have the following options:
- Manual Opening Button
- When choosing the Antenna in the combo, press the button and it sends an activation signal to the antenna output to open the device connected to this output.
- Configuration button
- Opens the configuration screen.
- Collect Readings Button
- When pressed, makes the connection antenna by antenna and extracts the reading data, identifying the Tag information with the registered residents and recording this information in the database.
- Generate Report button
- Opens the read data query screen.
- Antennas button
- Opens the Antenna registration screen.
- Residents button
- Opens the Residents registration screen.
- Logo Viaonda
- Clickable logo, pressing takes you to the Viaonda RFID page.
- Version
- Shows the current version of the Software.
Settings

On the co-settings screen we have the following options:
Collection
- There is the option of using only part of the Tag's EPC to validate the resident, as the tag has 24 digits, so if you choose to use only part of this number, always considering the end of the tag, and how many numbers you will use. When setting the preferences, save in the button inside the Collection container.
Clear Readings
- If you want to clear the readings, just type the password and click on the button to clear the bank readings. The default password is viaondarfid.
Change password
- To change the password that clears the readings, just type the old password, and put the new password and click on save. After saving, to clear the bank use the last saved password.
Antennas
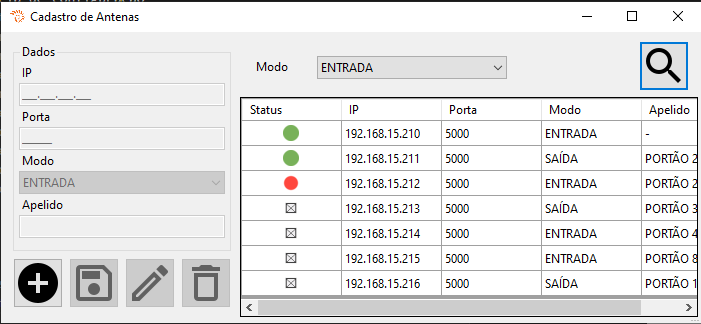
The first step is to register the antennas, after having done all their configuration, proceed with the registration. Below the features:
 Para iniciar o cadastro, clique no botão de Adicionar.
Put all the information of IP, Port, Mode (If it will read the Input or the Output), and put a name to identify it easily.
 Após as informações inseridas, clique no botão para Salvar.
The antenna will appear in the table next to the registered antennas.
In the first status column you can check if the antenna is online or offline.
Status Legenda 
ON 
OFF  By clicking on an antenna in the table it is possible to edit its information, after clicking and the information appears in the fields click on the edit button.
- After editing the desired data, click Save.
 If you want to delete the antenna just select it, when the data appears click on the delete button.
 To search for an antenna you can filter by Input or Output mode by choosing from the selection and clicking on the search button.
Moradores
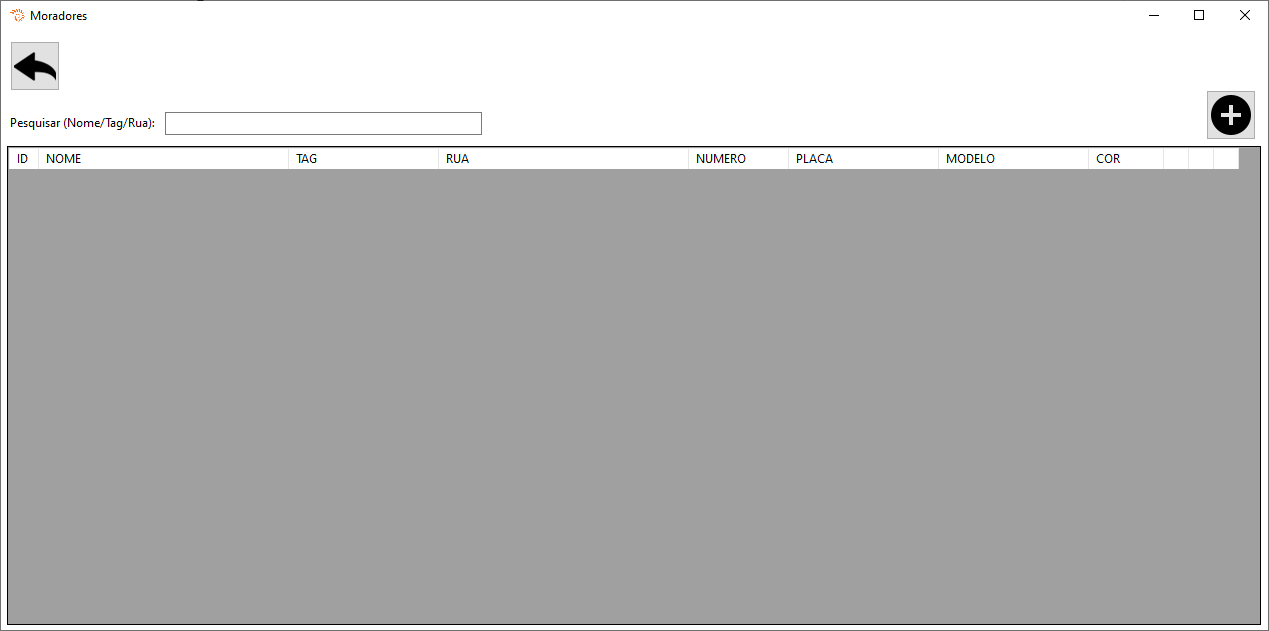
After registering the antennas, it is necessary to register the residents. The register has data on the resident and the vehicle, and the vehicle is not mandatory if the resident does not have one. The registration features are as follows:
- To start the registration, click on the Add button.
Put all the information of the resident and vehicle if you have one. Do not forget the tag, and if you chose to use part of the tag in the settings, put the number corresponding to the chosen size, checking this number on the tag.
- After entering the information, click on the Save button.
The Resident will appear in the table next to registered Residents.
- By clicking on a resident in the table it is possible to edit their information, after clicking and the information appears in the fields click on the edit button.
- After editing the desired data, click Save.
- If you want to exclude the resident, just select it, when the data appears, click on the delete button.
- To search for a resident, we can type Name, Tag or License Plate and click on search.
Warning
If there is more than one vehicle per resident, another registration of the same resident must be carried out with the data of the other vehicle, or register another person in the family who uses this vehicle.
Coletar Leituras
After all entries are made, the antennas will read and release residents according to their settings. So, to check the history of inputs and outputs, let's click on the collect readings button:
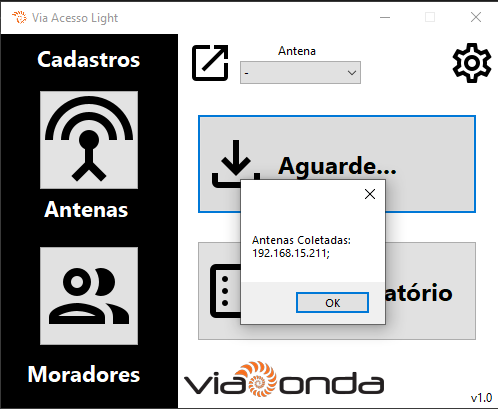
After pressing, it will ask you to wait, then the software will connect to each registered antenna and capture the reading data and the read times.
When it is captured, it will check which resident the read tag belongs to, recording the resident and vehicle information in the database, date and time of reading, data from the antenna that carried out the reading and whether it was input or output according to the antenna registration.
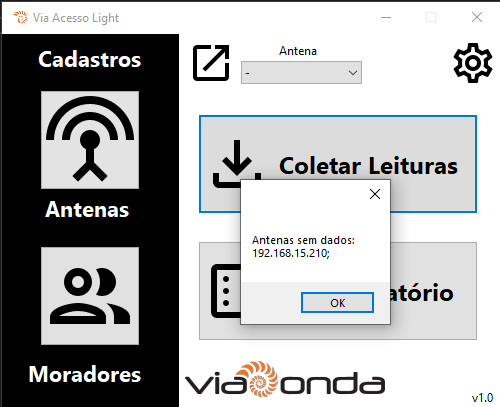
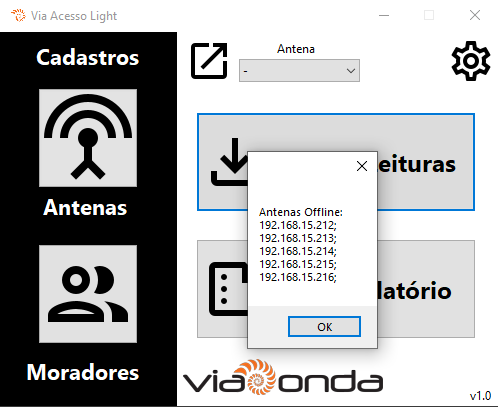
This will happen in the background, and when finished, it will notify that it has collected the data, and will also alert which antennas do not have data to be collected and if there are offline antennas.
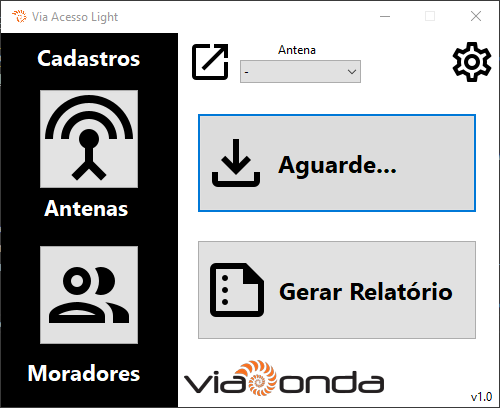
Wait for the messages and also that the text "Wait..." from the collection button disappears.
Gerar Relatório
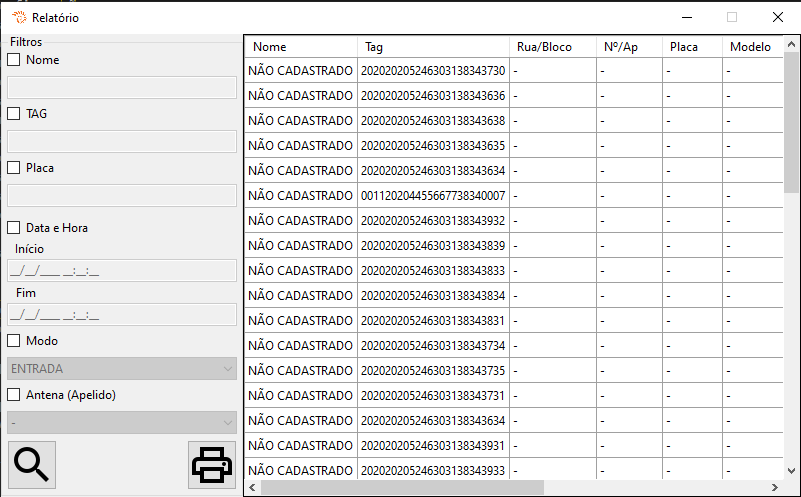
After the collection, we can generate the report of inputs and outputs. When opening the report screen we have filters on the left side, you can filter your search by:
- Name.
- tag.
- Plate.
- Date and Time (Single date or date range).
- Mode (Incoming or Outgoing).
- Antenna's nickname.
- Search antenna by nickname.
 Print report.