Linux Model
Starting Graphical Mode
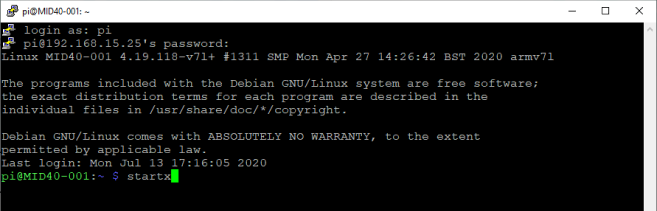
When the M-ID40 module is turned on, the operating system will already be initialized in terminal mode. By default, the graphical mode is disabled to make better use of the hardware and improve performance.
To use the Linux graphical mode, type the following command in the terminal:
startx
A loading message will be displayed and the system IDE will be loaded.
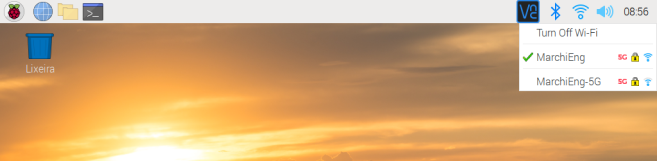
Connection to wireless network
Linux has a WiFi 2.4 GHz and 5.0 GHz and LAN adapter.
To connect to a network, go to the menu higher than the network option, by clicking a dropdown list will be displayed with WiFi networks, you can also activate or disable wifi by clicking ‘Turn off/on wifi’.
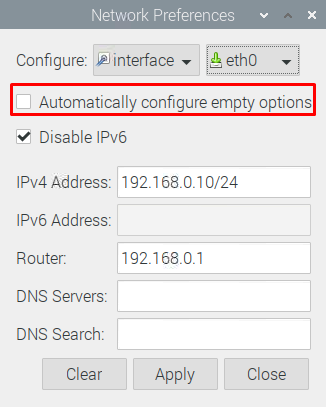
Network configuration in graphic mode
By right -clicking on the network icon, and selecting the Wireless & Wired Network Settings option, the network settings window is opened.
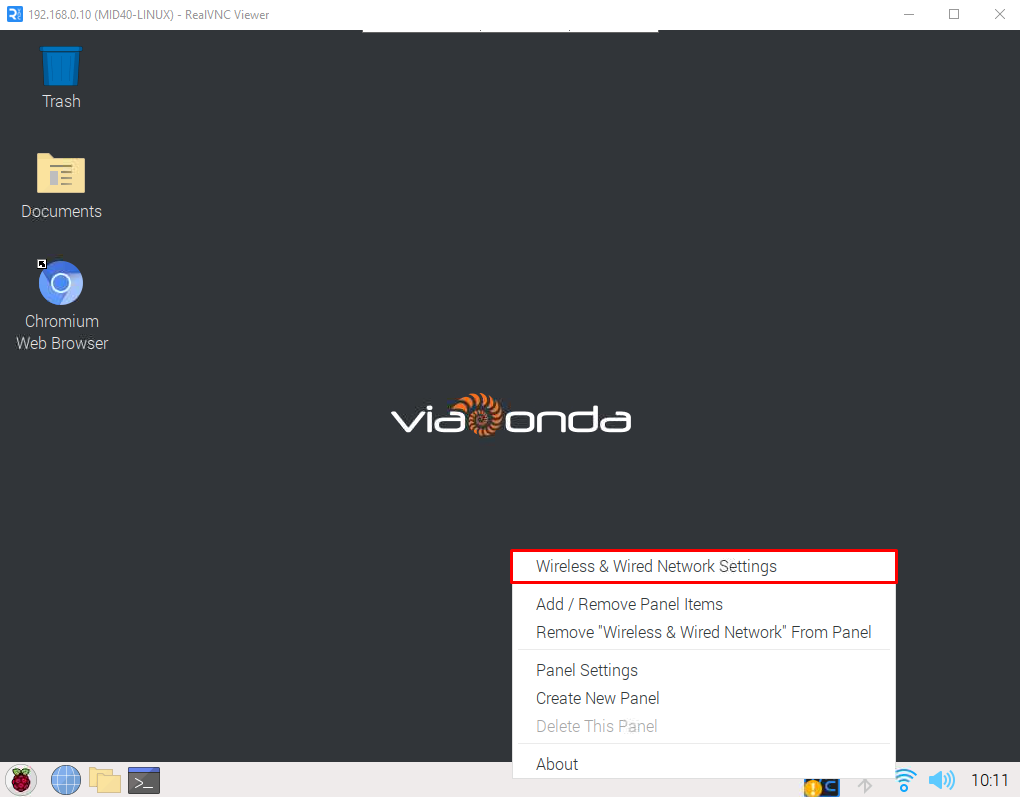

Important
In this window you can configure whether the reader's IP will be fixed or automatic for both wireless and cable network.
Putty network configuration
Connect to the reader by Putty using credentials:
- User: viaonda
- Password: viaondarfid
Edit the file /etc/dhcpcd.conf
So that the IP is automatic just comment (include "#" on beggining) The lines that define the fixed IP.
Should be as below:
interface eth0
noipv6
#static ip_address=192.168.0.10/24
#static routers=192.168.0.1
#static domain_name_servers=
#static domain_search=
Save the file and restart the reader for changes to be applied.
External access
The module makes available from a VNC server installed for external access and viewing the system interface internally. By default the access is made using the Username: viaonda and Password: viaondarfid.
Documents and Programs
Files to manage M-ID40 are gathered in the Document folder in the user directory within Linux.
Directory
To access a directory on Linux, type CD and the name of the directory you want to access.
cd Documents/
Listing Files
To list the existing files in a directory.
ls -ln
A detailed listing of the files will be displayed.
In Linux the demarcated files with green color are executable files.
Communication files with module
- getreaderinfo: Returns the reader configuration parameters.
- reset-database: Delete all records of the Tag Table and reset the value of auto_increment.
- rfid: Starts reading and inventory of the reader for all antennas.
- setantenna_on: Enables the antenna, passing its number as a parameter.
- setpower: configures the reader's output power in dB.
Run code
To run a script, type ./name-script, example:
./rfid
GPIO
The M-ID40 reader has 2 settings for input and output GPIOs configuration, allowing you to use the controls by the module and control by Linux, this definition can be requested at the time of purchase.
Pins
Being defined communication with Linux, the pins are:
| Pin | wiringPi | GPIO | Name | Header |
|---|---|---|---|---|
| Saída 1 | 2 | 27 | GPIO2 | 13 |
| Saída 2 | 0 | 17 | GPIO0 | 11 |
| Saída 3 | 12 | 10 | MOSI | 19 |
| Saída 4 | 13 | 9 | MISO | 21 |
| Entrada 1 | 3 | 22 | GPIO3 | 15 |
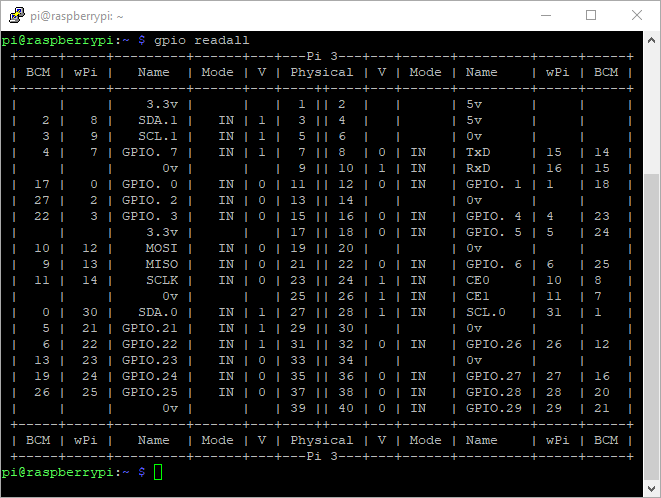
Pins Status
gpio readall
The readall command it presents the general status of all module pins and their respective references.
Define pin as output
gpio -g mode 10 out
- g: Use of GPIO pin references.
- 10: Pin number.
- mode: Pin Configuration as input/output.
- out: Configures as an output(out).
Define pin state
gpio -g write 10 1
- g: GPIO pin reference.
- write: write or read.
- 10: Pin number
- 1: Configures pin as high (1) or low (0)

Tag Readings
To start reading tags, run the rfid file in documents folder.
cd Documents/
./rfid
When running, information about the reader will be loaded to start reading, enter any key.
To finalize the reading, type Ctrl + C that the execution will be closed.
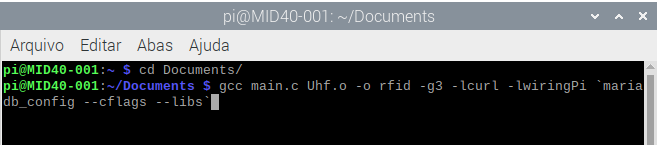
Compile Program
To compile a program through the Linux terminal, use the GCC passing as a parameter the libraries you want to use.
Example: If you want to make changes to the tag reading script, use the following command on the terminal within the document folder to compile.
gcc main.c Uhf.o -o rfid -g3 -lcurl -lwiringPi `mariadb_config --cflags --libs`
- gcc: Language Compiler for C and C++.
- main.c: File name C to compile.
- Uhf.o: External file used in reading.
- rfid: Output file name.
- -g3: Parameter used for debug.
- -lcurl: URL transfer library easy to use on customer side.
- -lwiringPi: Linux PI GPIO library for gpio access.
- mariadb_config --cflags --libs: Mariadb Library used for communication with the database.
Tags Structure Table
| Field | Description | Type | Null | Key | Default value | Extra |
|---|---|---|---|---|---|---|
| tag_id | Unique field identifier | int(11) | NO | PRI | NULL | auto_increment |
| tag_epc | Tag read EPC | varchar(50) | YES | NULL | ||
| tag_read_rssi | Value of RSSI | int(11) | YES | NULL | ||
| tag_read_date | Reading date | datetime | YES | NULL | ||
| tag_read_antenna | Antenna identification | int(11) | YES | NULL | ||
| tag_read_ws | Read registration control | int(11) | YES | NULL |

Dashboard
Dashboard containing the module configuration functions available. To access, navigate to the main directory of the equipment web server, accessing http://{ip_modulo}.
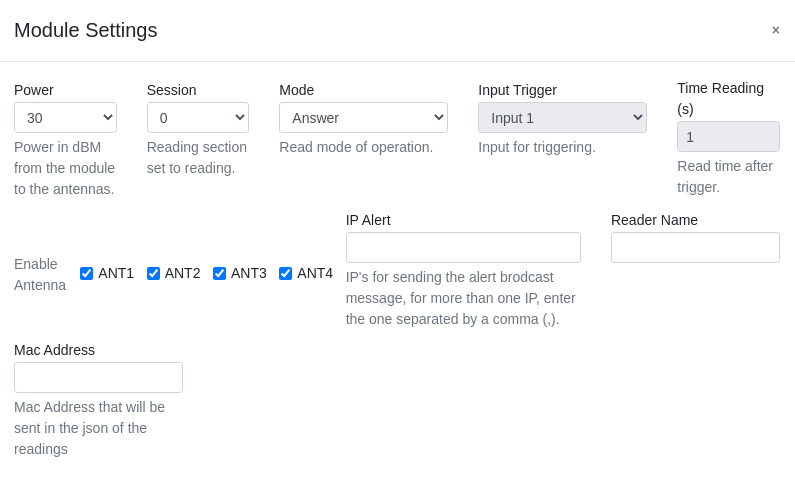
Power: Dbm power from the module to the antennas.Session: Defines the session that will be used in readings.- Session 0: The RFID tag responds to all requests made by the RFID reader.
- Session 1: When the RFID tag receives the reader's request for the first time, it responds with readiness. After that, the tag goes into a state of silence and is waiting between 0.5 to 5 seconds to respond to the next request.
- Session 2 or 3: The RFID tag responds the first time it was detected by the antenna. If it remains near the antenna, the label will not respond again. When you get out of the antenna range, after up to 20 seconds it will respond again.
Information
The time of silence is not configured, who defines this is the tag itself.
Mode: Reading Operation Mode.Input Trigger: Input selection for trigger.Time Reading: Reading time after the trigger.Enable Antenna: Enable and disable antennas.IP Alert: IPs to send the warning Broadcast message, for more than one IP insert it separated by comma(,).Reader Name: Reader name. Example: entry, exit, room 1, etc.Mac Address: Mac Address that will be sent at JSON of readings.
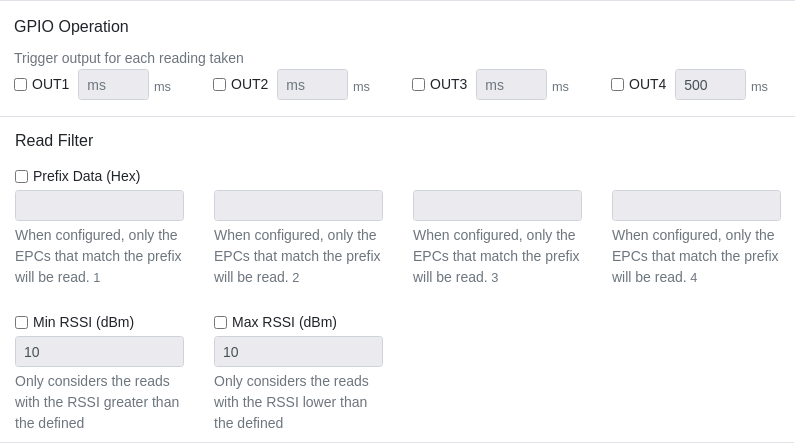
GPIO Operation: Trigger output for each reading made.Reading Filter: When configured will be read only the EPCs that correspond to the registered prefixes.Min RSSI: Considers only the readings with RSSI greater than the defined.Max RSSI: Considers only the readings with RSSI smaller than the defined.
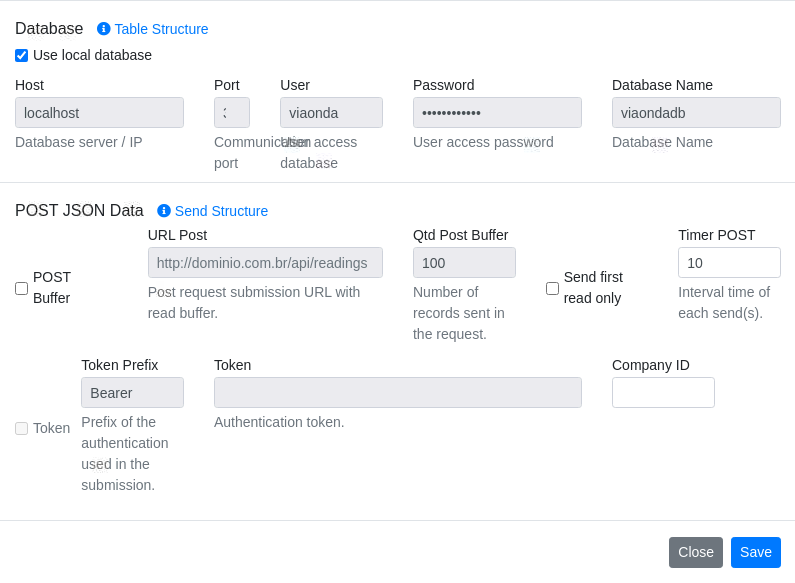
Database
The database is an internal server, aiming to store the readings realized, more efficiently carrying the data recorded on your device, This way bringing more productivity to your applications.
To access it, it can be done in the following ways:
Through the settings as shown in the example of the above image
Host: IP or host of the server where your database is hosted.Porta: Communication port.Usuário: Database access user.Senha: Password to access the database.Nome do Banco: Database Name.
To access the bank on Linux, enter the following command at the terminal and press ENTER.
mysql -u viaonda -p
The default password for the user viaondadb: viaonda@2018
- -u: Indicates the user which they want to use to connect to the database.
- viaonda: Username.
- -p: Indicates the user's password to connect with the database.
After accessing the database, you can use SQL commands to navigate, where the Tags table is registered, for example: use viaondadb;
Web Service
Documentation of the methods and functions on the web service is available in: API documentation.