Instructions for use
General operating diagram
The diagram shown above demonstrates the standard installation of the M-ID40 - Light module. When turning on the M-ID40 - Light for the first time, it will be in factory operating mode.
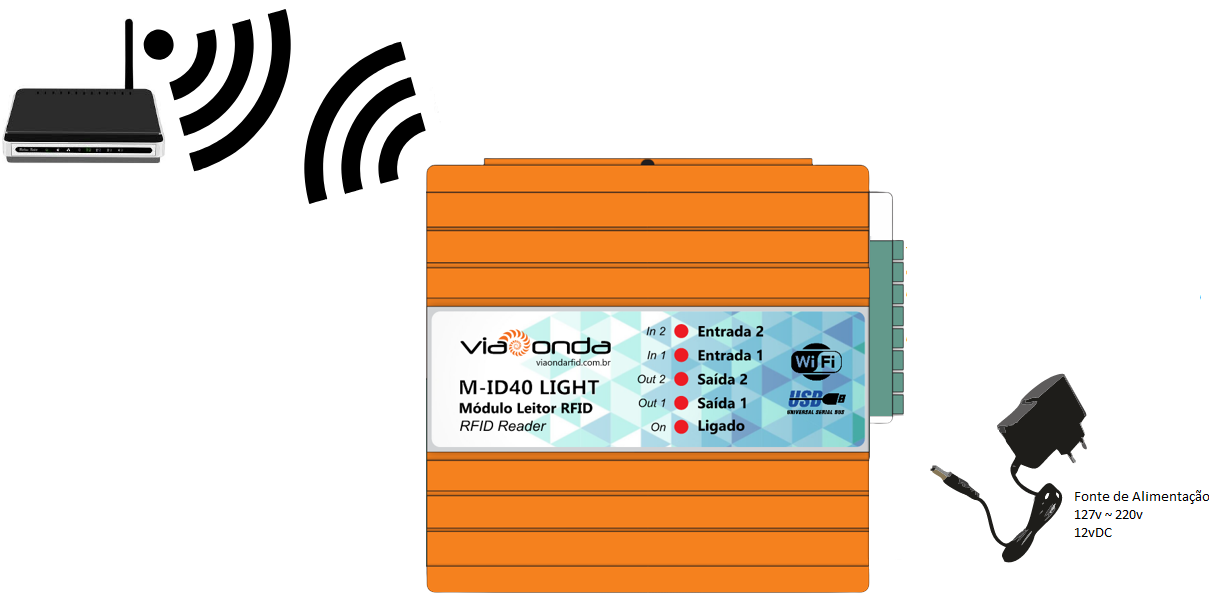
Attention
Be sure to use the power supply that was shipped with the player to avoid damage to the player's hardware.
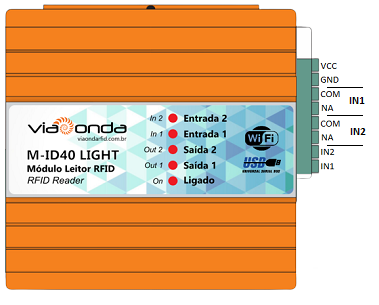
Description of terminals
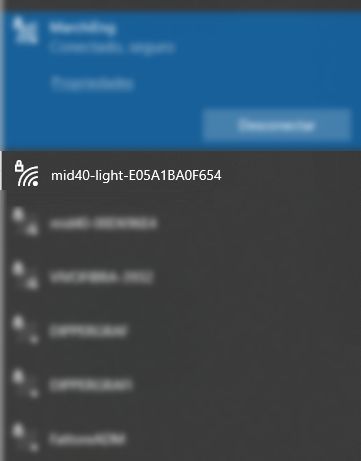
Initial Settings
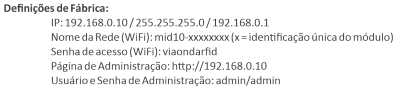
When turning on the M-ID40 - Light for the first time, it will have factory settings, therefore, a new Wireless network will be created and will wait for connections. The network name (SSID) is created by default, being mid40-light-xxxxxxxx (x = reader's unique identification).
The default password for connecting to Wifi is: viaondarfid
Admin page
Access to the administration/settings page is done through your browser (Google Chrome, for example) through the address: http://192.168.0.10
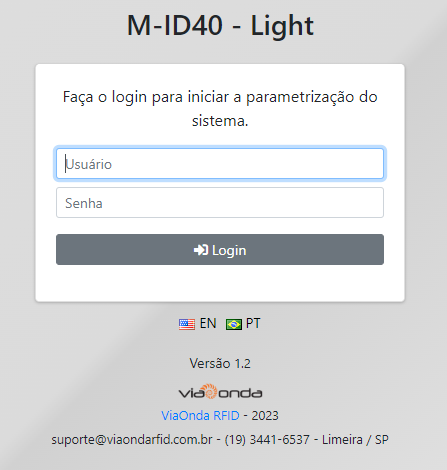
Default credentials are:
- User: admin
- Password: admin
Current data
In this section, the current network configuration data is displayed.

Wireless Parameters
In this session it is possible to define the Wireless parameters.

Operation mode:- Access Point: Defines that the M-ID40 - Light will be used as an access point (like a router).
- Station: Defines that the M-ID40 - Light will be used as a station, and must connect to an existing WiFi network.
In this mode, it is mandatory to fill in the name of the SSID network where the reader will connect, as well as the connection password. The IP addressing parameters must be defined manually, as the configuration does not allow operation in DHCP mode, only with a static IP address.
SSID: When in Access Point mode, the SSID is automatic. When in Station mode, it is necessary to inform the name of the SSID network where the reader must connect.Connection Password: When in Access Point mode, it is the password required to connect new clients. When in Station mode, it is the SSID network connection password where the reader should connect.The player will try to connect to the provided network for 10 times with an interval of 5 seconds. If it fails to connect, the reader will automatically restart, repeating the connection process.
Socket Server Port: It is the network port that the reader will open a listener waiting for external connections. It is used when the equipment is operating in Answer Mode mode.IP: Static IP of the reader.Mask: Netmask.Gateway: Network Gateway IP address.Operation Channel: WiFi operation channel used by the equipment. (Only in Access Point mode)
General Parameters
In this session it is possible to define the general parameters of the equipment.

User: username used to login to the administration page.Password: access password for the login in the administration page.Print RFID TX data on Serial Debug: allows turning on or off the sending of Debug data to the RX2 auxiliary output.Print RFID RX data on Serial Debug: it allows turning on or off the reception of Debug data for the TX2 auxiliary output.
Radio frequency parameters
In this session it is possible to define the RFID working parameters and automatic operation.
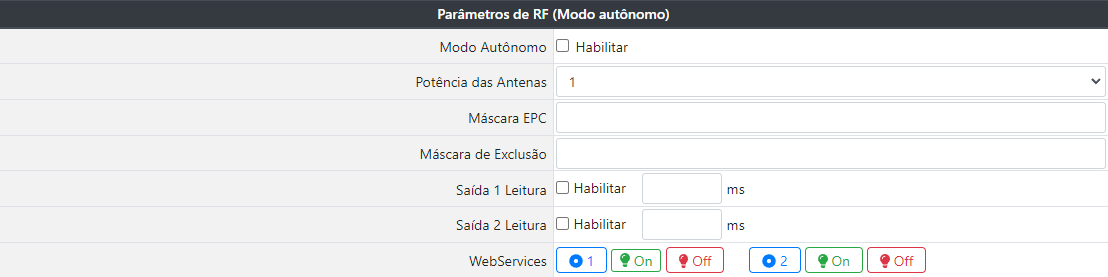
Active Mode: when enabled, the reader automatically enters the reading operation, sending the read tags through the format configured for reception in the software.Antenna Power: defines the reading power, from 1dBm to 31dBm.EPC mask: defines the reading mask. The filter length must be between 1 and 24 digits, and can filter on the EPC prefix or a unique tag. The filter defined here is considered for automatic triggering of output GPIO, sending to URL and sending to additional TTL/RS232 output.Example: If the mask 3034541 is defined, only the tags that have the EPC with the same beginning as the mask will be processed, the others will be discarded.
Exclusion mask: when a tag must be discarded, the EPC mask can be informed. The filter length must be between 1 and 24 digits.Reading output 1: when configured in Active Mode, it defines the time in which output 1 will be kept ON after reading the TAG. If the EPC mask is enabled, only the tags that respect the mask will trigger the digital output (with the exception of tags included in the exclusion list.).Reading output 1: when configured in Active Mode, it defines the time in which output 2 will be kept ON after reading the TAG. If the EPC mask is enabled, only the tags that respect the mask will trigger the digital output (with the exception of tags included in the exclusion list.).Web services: used for input status and GPIO's activation.
See the Web services section for information on collecting and clearing the buffer.
| Operation | URL | |
|---|---|---|
| Collect Input GPIO Status 1 | http://[IP]:8080/getInput1Status | |
| Trigger Output 1 GPIO | http://[IP]:8080/gpio.php?output=1&status=on | |
| Turn off GPIO Output 1 | http://[IP]:8080/gpio.php?output=1&status=off | |
| Collect Input GPIO Status 2 | http://[IP]:8080/getInput2Status | |
| Trigger Output 2 GPIO | http://[IP]:8080/gpio.php?output=2&status=on | |
| Turn off GPIO Output 2 | http://[IP]:8080/gpio.php?output=2&status=off |
Firmware update
The equipment will only notify if there is an update if it is in *Station mode.
When an update is available, you can update it through the reader's administration/configuration page. After update, the player will be reset to factory default.

Attention
While the equipment is being updated, it is crucial that it is not turned off and that the internet has a stable connection.
Restore factory default
The M-ID40 - Light has a reset button, which can restore the settings to factory defaults. To restore, just disconnect the equipment from the power source, press the button, turn on the equipment. Keep the button pressed for 10 seconds while the module is started or with the equipment turned on, press the button until you hear a long press on your buzzer, this will restore the WiFi settings to factory defaults.
Restart Reader
Apply equipment reset without affecting settings.
To save
Apply the settings on the player. The configurations are saved in the equipment and remain even after it is turned off.
language
The administration page is available in 2 languages, English and Portuguese. To switch between languages, simply select the desired language flag and the page will refresh automatically.