Instructions for use
Description of wires

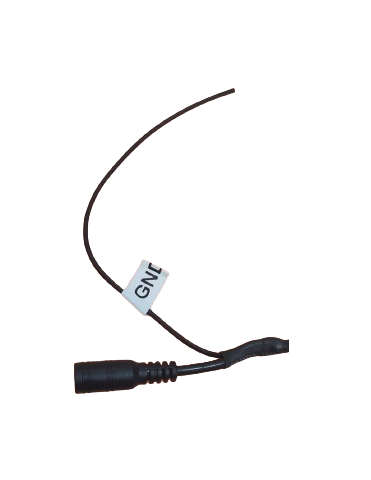
The color of the Input2 wires may vary according to the version.
Observation!
In the antenna connector there is a second GND cable according to the image above.
Attention
Be sure to use the power supply that was shipped with the player to avoid damage to the player's hardware.
Initial Settings
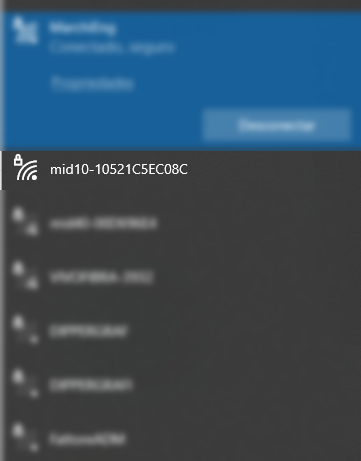
When turning on the M-ID10W for the first time, it will have factory settings, therefore, a new Wireless network will be created and will wait for connections. The network name (SSID) is created by default, being mid10-xxxxxxxx (x = reader's unique identification).
The default password for connecting to Wifi is: viaondarfid
Admin page
Access to the administration/settings page is done through your browser (Google Chrome, for example) through the address: http://192.168.0.10

Default credentials are:
- User: admin
- Password: admin
Current data
In this section, the current network configuration data is displayed.

When your model does not have an RTC (Real Time Clock), the message: RTC NOT PRESENT ON THIS BOARD VERSION will be displayed in the Date and Time field.
Wireless Parameters
In this session it is possible to define the Wireless parameters.

- Operation mode:
- Access Point: Defines that the M-ID10W will be used as an access point (like a router).
- Station: Defines that the M-ID10W will be used as a station, and must connect to an existing WiFi network.
In this mode, it is mandatory to fill in the name of the SSID network where the reader will connect, as well as the connection password. The IP addressing parameters must be defined manually, as the configuration does not allow operation in DHCP mode, only with a static IP address.
- SSID: When in Access Point mode, the SSID is configurable, changing the name of the Wifi network as you wish. When in Station mode, it is necessary to inform the name of the SSID network where the reader must connect.
- Connection Password: When in Access Point mode, it is the password required to connect new clients. When in Station mode, it is the SSID network connection password where the reader should connect.
The player will try to connect to the provided network for 10 times with an interval of 5 seconds. If it fails to connect, the reader will automatically restart, repeating the connection process.
- Socket Server Port: It is the network port that the reader will open a listener waiting for external connections. It is used when the equipment is operating in Answer Mode.
- IP: Static IP of the reader.
- Mask: Netmask.
- Gateway: Network Gateway IP address.
- Operation Channel: WiFi operation channel used by the equipment (Only in Access Point mode).
- Host: Apply DNS to customize the access link of your reader settings, as shown in the example below.

General Parameters
In this session it is possible to define the general parameters of the equipment.

User: username used to login to the administration page.Password: access password for the login in the administration page.Print RFID TX data on Serial Debug: allows you to turn on or off the sending of Debug data to the auxiliary output RX2.
Radio frequency parameters
In this section it is possible to define the RFID working parameters and automatic operation.
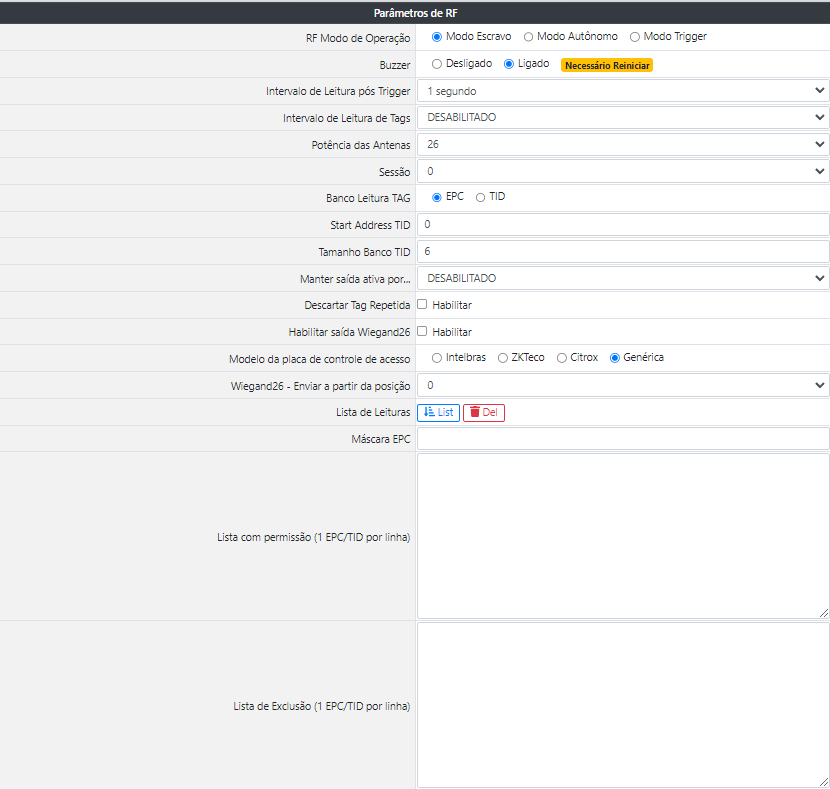
RF Operation Mode: defines the operation behavior of the RFID reader, being:- Answer Mode: It is used when the equipment must wait for reading commands coming from the DLL library or from the network Socket.
Access http://restrito.viaondarfid.com.br for SDK download and ancillary support documents.
- Active Mode: In this mode, the reader automatically enters the reading operation, recording the read tags in the buffer, memory card or sending them to a URL, when configured.
- Active Mode (Trigger): Like the previous mode, in this mode, the reader will wait for a pulse in the input GPIO to perform the reading. This is a standalone read based on a condition.
- Answer Mode: It is used when the equipment must wait for reading commands coming from the DLL library or from the network Socket.
Buzzer: enables or disables Buzzer. Need to restart the reader after settingPost Trigger Reading Interval: defines the time the reader must wait to read a tag after the input GPIO pulse.For example: If it is defined as 5 seconds, the reader will wait, after the pulse in the input GPIO, for 5 seconds for the identification of the TAG. If no tag is read in this interval, the reader cancels the reading and will wait for a new pulse. If a tag is read before the defined time, the reader will finish reading and wait for a new pulse.
Tag reading interval: determines the Tag reading interval time.Antenna Power: defines the reading power, from 1dBm to 26dBm.Session: Energizes the tag to be read again, only when it is unloaded.Tag Reading Bank: defines the memory bank that will be read from the tag.EPC: hexadecimal code with free recording, used to identify a certain product, category, collaborator, etc.TID: tag identification hexadecimal code, predefined by the manufacturer, it can be read, but not edited.
Start Address TID: search for data in the reading bank, according to the configured position.TID bank size: configures, in bytes, the size of the TID in the tag to be searched.Keep output active for...: when configured in Active Mode or autonomous with trigger, it defines the time in which the digital output will be kept ON after reading the TAG. If the EPC mask is enabled, only the tags that respect the mask will trigger the digital output (with the exception of tags included in the exclusion list.). This time can vary from 0 (DISABLED) to 30 seconds.Discard Repeated Tag: when selected, it discards the repeated reading of the same tag in sequence.Enable Wiegand26 output: when enabled, it enables wiegand communication with the controller board.Access control board model: defines the controller board model to be used.Wiegand26 - Send from position: defines the starting position of the EPC that will be sent.Reading list: returns the last 10 readings performed by the reader, in the following format:
{
  "message": "Get tag list",
  "data": [
    {
      "EPC": "3074257BFA4FCA40000000CB",
      "Start Position": "0",
      "Hex ID": "307425",
      "Decimal": "3175461",
      "Facility Code": "48",
      "Card Code": "29733",
      "Data Wiegand": "4829733",
    },
  ]
}
EPC: tag identification in hexadecimal format.
Start Position: starting position configured in the Start Address TID.
Hex ID: EPC code of the tag counting from the position configured in the Start Address TID.
Decimal: conversion of the hexadecimal id to decimal.
Wiegand date: decimal code transmitted to Wiegand.
EPC Mask: when enabled, the reader will only signal reading in tags that contain the configured prefix.EPC Hex Mask: defines the reading mask. The filter length must be between 1 and 24 digits, and can filter on the EPC prefix or a unique tag. The filter defined here is considered for automatic triggering of output GPIO, sending to URL and sending to additional TTL/RS232 output.Example: If the mask 3034541 is defined, only the tags that have the EPC with the same beginning as the mask will be processed, the others will be discarded.
List with permission (1 EPC per line): allows tag registration control in the reader, when a tag is registered in this function the reader will disregard the reading of other tags, which are not registered in this list.Exclusion List (1 EPC per line): when a tag must be discarded, even if it is within the mask rule, the complete EPC of the TAG (24 digits) that must (must) be discarded can be entered in this list (s).
Firmware update
When an update is available, you can update it through the reader's administration/configuration page. After updating, the player will restart.

Attention
While the equipment is being updated, it is crucial that it is not turned off and that the internet has a stable connection.
Restore to Factory Default
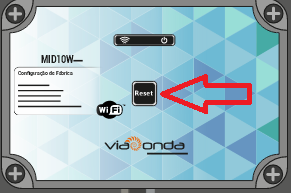
The M-ID10W, It has a reset button when pressed once the equipment will be restarted. To restore factory default follow the steps below.
- Turn off the equipment from the power source.
- With the equipment off, press and keep the reset button pressed.
- With the button pressed, connect the equipment again on power source. Once this is done the equipment will issue a short sound.
- Keep pressing the reset button for another 15 to 30 seconds until emit another longer sound. This will indicate that the equipment has returned to factory defaults.
In current versions it is possible following the step below.
- With equipment on, keep the reset button pressed until it emits a long beep, should occur after 15 to 30 seconds after pressed.
Attention
With factory restore, readings that are saved on the SD card will be deleted.
Restart Reader
Apply equipment reset without affecting settings.
To save
Apply the settings on the player. The configurations are saved in the equipment and are maintained even after it is turned off.
Language
The administration page is available in 2 languages, English and Portuguese. To switch between languages, simply select the desired language flag and the page will refresh automatically.